Monday, August 19, 2024

Cloning an Oracle V19C Pluggable database to a different host using RMAN duplicate and database link

We have a requirement to perform some archiving and purging of a database, and we need to take a copy of Production which we can use to test.

One option is to create a PDB clone from the Production database since it is using containers.

I created an OEL7 VM in Proxmox, then installed Oracle ASM V19C and the 19C database software. then created a container database (orcl) and a pluggable database (orclpdb).  I won't go through this, it's pretty straight-forward.

I then cloned the VM to save me having to re-create one from scratch.

When the clone was done, I changed the hostname and IP address. So I ended up with 2 VMs, one called OEL7ASM1 and OEL7ASM2.

I also dropped the orclpdb pluggable database from the OEL7ASM2 host so that I can create it from the OEL7ASM1 host.


I added the source host oel7asm1 into the oel7asm2 /etc/hosts file and also created a tnsnames.ora entry for the source database. Make sure you use the FQDN


I couldn't get the tnsping or sqlplus connection to the ORCL_REMOTE database, even after enabling port 1521, so I ended up disabling the firewall and then it worked. Needless to say, don't do this on any client or host that you care about.

On the oel7asm2 host, trying to contact the source host before the firewall was disabled:


Disabling the firewall on the source host:


Trying the connection again from the target host

Before doing the clone, create a staging directory and set the target database REMOTE_RECOVERY_FILE_DEST parameter:

mkdir /tmp/pdbclone


You also need to put the source database in archivelog mode and open


You can now try the pdb clone using RMAN duplicate.

On the target host, connect to RMAN target and auxiliary and issue the RMAN command to perform the PDB duplicate. The target is the source, the auxiliary is where the database is to be cloned to.


The pdb should now be there


This method requires a staging area (/tmp/pdbclone). 

We can also use a database link which doesn't, so we'll do that now.

Drop the newly created pdb


Create a user on the source PDB database and give them DBA access and grants to create a pluggable  database


Create a new tnsnames.ora entry on the target host pointing to the pdb service on the source


On the target CDB, create a database link to the source as that user, using the tnsnames.ora entry that points to the source pdb:


Run the command to create the target pluggable database, then open it:


You can then drop the database link.


Wednesday, August 14, 2024

Upgrading Oracle Grid ASM 12C to 19C

In my previous post I installed Oracle ASM Grid Infrastructure V19 into a VM, and now I've decided to install V12 and do an upgrade to V19, because I have one coming up.

Once again I used OEL7, this ISO: OracleLinux-R7-U9-Server-x86_64-dvd.iso

When installing it into a VM (I use Proxmox, VirtualBox will work), select Server with GUI and make it at least 10GB RAM, 4 CPUs (2 cores, 2 Sockets) and 100GB or more of Disk.

When installed, do a yum update, then shut it down and edit it to add another disk (40GB is fine). The disk won't show up initially but will be added to ASM.

The 12C downloads aren't available on the main Oracle download page any more, so you need to go to edelivery.oracle.com and search for them there. You need to search for  Oracle Database Grid Infrastructure and Database 12C.


Once these have been downloaded, move them to /tmp.

I did try to install V19C database, but it complained that  ASM version was too low and I had to upgrade that first. 

Do another yum update, then install (as root), the pre-install packages:

Open a terminal and install the required packages for the database and ASM:

sudo yum -y install oracle-database-server-12cr2-preinstall

sudo yum -y install oracleasm-support oracleasm kmod-oracleasm wget

Change the host name to something meaningful:

vi /etc/hosts

192.168.1.120 oel7asm2 oel7asm2.localdomain

and 

vi /etc/hostname

oel7asm1.localdomain

Reboot the VM.

As root, create the groups and users

groupadd -g 54327 asmdba

groupadd -g 54328 asmoper

groupadd -g 54329 asmadmin

useradd -u 54322 -g oinstall -G dba,asmdba,asmoper,asmadmin,racdba grid

Create the directories and assign ownership

mkdir -p /u01/app/grid/product/12.0.0/grid_home

mkdir -p /u01/app/oracle/product/12.2.0/dbhome_1 

mkdir -p /u01/app/oraInventory 

chown -R oracle:oinstall /u01

chown -R grid:oinstall /u01/app/grid

chown -R grid:oinstall /u01/app/oraInventory

Allow the oracle user access to ASM

usermod -u 500 -g oinstall -G dba,oper,asmdba,asmoper,asmadmin,kmdba,dgdba,backupdba,racdba oracle 

Set up asm - run this as root

oracleasm init

oracleasm configure -i

Enter 'grid'

Enter 'oinstall'

Enter 'y'

Enter 'y' 


You can now use the disk you added and configure it with ASM:

fdisk -l 

look for the 40GB disk you added:


Format it into 2 partitions - one will be DATA, one will be FRA.
fdisk /dev/sdb
Enter 'n' for a new partition, then enter at the next 3 prompts, then +30G to make the first partition 30GB.
Enter 'n' again and then enter for all the prompts to create the second partition with the rest of the space (10GB).
Finally, enter 'w' to create the partitions


Create the ASM disks

oracleasm createdisk DATA2 /dev/sdb1
oracleasm createdisk FRA2 /dev/sdb2

Then scan and list the disks 


You can now install the GI software.

Set the password for the grid and oracle users as the root user

passwd grid

passwd oracle

Login as the grid user and install the grid home from the zip file.

export ORACLE_HOME=/u01/app/grid/product/12.0.0/grid_home

export PATH=$ORACLE_HOME/bin:$PATH

cd $ORACLE_HOME

pwd

/u01/app/grid/product/12.0.0/grid_home

unzip -oq /tmp/V840012-01.zip

Once extracted, run the installer as the grid user

./gridSetup.sh

Select 'Configure...for Standalone Server'


Click 'next'

At the next screen, click on 'Change Discovery Path" and enter "/dev/oracleasm/disks*' and click 'OK'


You should then see this


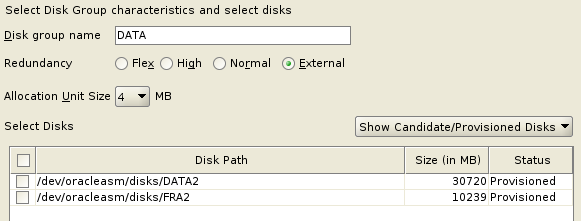
Rename the Disk Group to DATA2, change the Redundancy to 'External' and check the box next to '/dev/oracleasm/disks/DATA2'


Click 'Next' - we'll add FRA2 in a minute.

Select 'Use the same password' and enter a suitable one, then click 'Next'


Click 'Next' at the EM screen.

Click 'Next' at the OS group screen.

Change the Oracle Base to /u01/app/grid and click 'Next'


Click 'Next' at the Inventory Directory screen.

Select 'Automatically run scripts' and enter the root password.


Click 'Next'

Fix or ignore any checks and click 'Next'

Click 'Install'

Click 'Yes' at the 'scripts need to be run as root' pop-up.

Close the dialogue when complete.

Export the ORACLE_HOME and PATH

export ORACLE_HOME=/u01/app/grid/product/12.0.0/grid_home
export PATH=$ORACLE_HOME/bin:$PATH

Run asmca

asmca

A GUI should start - expand 'Disk Groups' then click on it

Click on 'Create'


Enter FRA2 as the name, select 'External' for Redundancy and check the box next to the path

Click 'OK', the disk group will be added


You can now create a database and use ASM for the files.

Login to the host as oracle

Set the environment

export ORACLE_HOME=/u01/app/oracle/product/12.2.0/dbhome_1
export PATH=$ORACLE_HOME/bin:$PATH

cd $ORACLE_HOME

unzip -oq /tmp/V839960-1.zip

Once extracted, run the software installer

./runInstaller

Uncheck the 'I wish to receive security updates' and click next, then OK at the pop up.

Select 'Set up Software Only' and click 'Next'

Select 'Single Instance' and click 'Next'

Select 'Enterprise Edition' and click 'Next'

Click 'Next' at the Oracle Base screen

Select 'Next' at the Group screen

Fix or ignore the checks, click 'Next' and then 'Install'

Log in as root and run the scripts and acknowledge.

Close when complete.

Log in as Oracle, run the dbca to create a database

           export ORACLE_HOME=/u01/app/oracle/product/12.2.0/dbhome_1
           export PATH=$ORACLE_HOME/bin:$PATH

dbca

Check 'Create a database' and click 'Next'

Enter a database name if required.

Note the ASM disks are filled in


Enter a password, and create as a Container if you like. Click Next


Click 'Finish'

Now you have a 12C database running on 12C GI ASM; time to upgrade to V19C ASM and then upgrade the database.

Download the 19c GI software: oracle19c-linux-downloads.html


You need to download and apply this patch for GI and database: 28553832.

You also need the latest Opatch (search in MOS for 'latest Opatch, download it, login as the grid user and set the environment, copy it to $ORACLE_HOME, rename $ORACLE_HOME/OPatch to OPatch_old then extract the Opatch zip file).


Copy the patch file to a new directory and extract it


Login as root, set the PATH and apply the patch


If all OK, you should see this


Upgrade the GI to V19C.


Create a directory as grid

mkdir -p /u01/app/grid/product/19.3.0/grid_home

Copy the 19c Grid zip file there and extract it


Clear out your environment variables by logging out of the grid user and back in, and check ORACLE_BASE, ORACLE_SID and ORACLE_HOME are not set

echo $ORACLE_HOME
echo $ORACLE_BASE
echo $ORACLE_SID


Run the upgrade 

cd /u01/app/grid/product/19.3.0/grid_home

./gridSetup.sh


NOTE: if CRS is running on the host, which it might be at a client site, you can run the upgrade in dry run mode which will simulate the upgrade and let you check for any issues:

./gridSetup.sh -dryRunForUpgrade


Check 'Upgrade Oracle Grid Infrastructure'

Click Next

Skip the Register with OEM screen (click Next)

Click 'Next' at the ORACLE_BASE screen

Check 'Automatically run config scripts' and enter the root password


Click Next

Ignore or fix any checks

Click next

Click Submit


Hopefully you'll see this


If you check /etc/oratab, it should have the new HOME


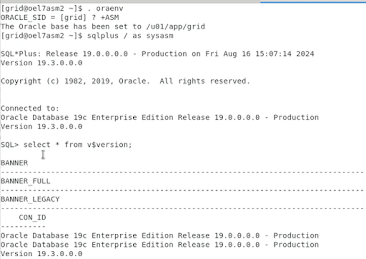
If you run asmca it will show V19C


The ASM database is now V19C


You might want to remove the oracle install and patch zip files to free up space.