I've long wanted to install ASM Grid Infrastructure into a VM for training, but never managed to get it to work and couldn't be bothered to troubleshoot. But now I have, so here it is.
I first tried it on OEL9, then OEL8 but neither worked when installing one of the packages, so eventually tried OEL7 and got it to work.
So, first download the OEL7 ISO and create a VM - I use Proxmox, but obviously VirtualBox will work.
This is the ISO I used: OracleLinux-R7-U9-Server-x86_64-dvd.iso
I'm not going to go through it here, but just go through the install process; select 'Server with GUI'.

Make it reasonably sized, I used 12GB RAM, 2 CPU Sockets and 2 CPU cores and 50GB disk (you will add more later).
Once installed, shutdown the VM and edit it to add a new disk, make it 40GB. Restart the VM.
The new disk won't show up in a 'df -h', but that doesn't matter, it will be added to ASM later.
Open a terminal and do sudo yum update and wait for it to complete.
Open Firefox and download the Grid and Database installation zip files.
You'll need to set up an Oracle support account if you don't already have one (it's free).
Once downloaded, move them to /tmp.
Open a terminal and install the required packages for the database and ASM:
sudo yum -y install oracle-database-preinstall-19c.x86_64
sudo yum -y install oracleasm-support oracleasm kmod-oracleasm wget
Change the host name to something meaningful:
vi /etc/hosts
192.168.1.120 oel7asm1 oel7asm1.localdomain
and
vi /etc/hostname
oel7asm1.localdomain
Reboot the VM.
As root, create the groups and users
groupadd -g 54327 asmdba
groupadd -g 54328 asmoper
groupadd -g 54329 asmadmin
useradd -u 54322 -g oinstall -G dba,asmdba,asmoper,asmadmin,racdba grid
Create the directories and assign ownership
mkdir -p /u01/app/grid/product/19.0.0/grid_home
mkdir -p /u01/app/oracle/product/19.0.0/dbhome_1
mkdir -p /u01/app/oraInventory
chown -R oracle:oinstall /u01
chown -R grid:oinstall /u01/app/grid
chown -R grid:oinstall /u01/app/oraInventory
Allow the oracle user ASM access
usermod -u 500 -g oinstall -G dba,oper,asmdba,asmoper,asmadmin,kmdba,dgdba,backupdba,racdba oracleSet up asm - run this as root
oracleasm init
oracleasm configure -i
Enter 'grid'
Enter 'oinstall'
Enter 'y'
Enter 'y'

You can now use the disk you added and configure it with ASM:
fdisk -l
look for the 40GB disk you added:

Here it's /dev/sdb
Format it into 2 partitions - one will be DATA, one will be FRA.
fdisk /dev/sdb
Enter 'n' for a new partition, then enter at the next 3 prompts, then +30G to make the first partition 30GB.
Enter 'n' again and then enter for all the prompts to create the second partition with the rest of the space (10GB).
Finally, enter 'w' to create the partitions

Create the ASM disks
oracleasm createdisk DATA1 /dev/sdb1
oracleasm createdisk FRA1 /dev/sdb2


You can now install the GI software.
Set the password for the grid and oracle users as root
passwd grid
passwd oracle
Login as the grid user and install the grid_home from the zip file.
export ORACLE_HOME=/u01/app/grid/product/19.0.0/grid_home
export PATH=$ORACLE_HOME/bin:$PATH
cd $ORACLE_HOME
pwd
/u01/app/grid/product/19.0.0/grid_home
unzip -oq /tmp/LINUX.X64_193000_grid_home.zip
Once extracted, run the installer
./gridSetup.sh
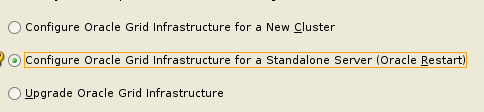
Select 'Configure...for Standalone Server'
Click 'Next'
At the next screen, click on 'Change Discovery Path" and enter "/dev/oracleasm/disks*' and click 'OK'

You should then see this:

Optionally rename the Disk Group to DATA1, change the Redundancy to 'External' and check the box next to '/dev/oracleasm/disks/DATA1'

Click 'Next' - we'll add FRA1 in a minute.
Select 'Use the same password' and enter a suitable one, then click 'Next'
Click 'Next' at the EM screen.
Change the Oracle Base to /u01/app/grid and click 'Next'

Click 'Next' at the Inventory Directory screen.
Select 'Automatically run scripts' and enter the root password.

Click 'Next'
Fix or ignore any checks and click 'Next'
Click 'Install'export ORACLE_HOME=/u01/app/grid/product/19.0.0/grid_homeexport PATH=$ORACLE_HOME/bin:$PATH
asmca


Click 'OK', the disk group will be added

Click 'Exit'
. oraenv+ASMasmcmd lsdg
export ORACLE_HOME=/u01/app/oracle/product/19.0.0/dbhome_1export PATH=$ORACLE_HOME/bin:$PATHcd $ORACLE_HOMEunzip -oq /tmp/LINUX.X64_193000_db_home.zip
./runInstaller

Fix or ignore the checks, click 'Next' and then 'Install'
dbca

Let it default, enter a password and uncheck 'Create as container database'. Click 'Next'

So...I shutdown the VM to save resources, and then wanted to have another look and restarted it - and ASM wouldn't start, it gave various CRS errors and just wouldn't start. A bit of investigation found this