Monday, August 12, 2024

Installing Oracle V19 Grid ASM and a V19C database into a VM

I've long wanted to install ASM Grid Infrastructure into a VM for training, but never managed to get it to  work and couldn't be bothered to troubleshoot. But now I have, so here it is.

I first tried it on OEL9, then OEL8 but neither worked when installing one of the packages, so eventually tried OEL7 and got it to  work.

So, first download the OEL7 ISO and create a VM - I use Proxmox, but obviously VirtualBox will work.

This is the ISO I used: OracleLinux-R7-U9-Server-x86_64-dvd.iso

I'm not going to go through it here, but just go through the install process; select 'Server with GUI'.



Make it reasonably sized, I used 12GB RAM, 2 CPU Sockets  and 2 CPU cores and 50GB disk (you will add more later).

Once installed, shutdown the VM and edit it to add a new disk, make it 40GB. Restart the VM.

The new disk won't show up in a 'df -h', but that doesn't matter, it will be added to ASM later.

Open a terminal and do sudo yum update and wait for it to complete.

Open Firefox and download the Grid and Database installation zip files.

oracle19c-linux-downloads.html

You'll need to set up an Oracle support account if you don't already have one (it's free).

Once downloaded, move them to /tmp.

Open a terminal and install the required packages for the database and ASM:

sudo yum -y install oracle-database-preinstall-19c.x86_64

sudo yum -y install oracleasm-support oracleasm kmod-oracleasm wget

Change the host name to something meaningful:

vi /etc/hosts

192.168.1.120 oel7asm1 oel7asm1.localdomain

and 

vi /etc/hostname

oel7asm1.localdomain

Reboot the VM.

As root, create the groups and users

groupadd -g 54327 asmdba

groupadd -g 54328 asmoper

groupadd -g 54329 asmadmin

useradd -u 54322 -g oinstall -G dba,asmdba,asmoper,asmadmin,racdba grid

Create the directories and assign ownership

mkdir -p /u01/app/grid/product/19.0.0/grid_home

mkdir -p /u01/app/oracle/product/19.0.0/dbhome_1 

mkdir -p /u01/app/oraInventory 

chown -R oracle:oinstall /u01

chown -R grid:oinstall /u01/app/grid

chown -R grid:oinstall /u01/app/oraInventory

Allow the oracle user ASM access

usermod -u 500 -g oinstall -G dba,oper,asmdba,asmoper,asmadmin,kmdba,dgdba,backupdba,racdba oracle

Set up asm - run this as root

oracleasm init

oracleasm configure -i

Enter 'grid'

Enter 'oinstall'

Enter 'y'

Enter 'y' 


You can now use the disk you added and configure it with ASM:

fdisk -l 

look for the 40GB disk you added:


Here it's /dev/sdb

Format it into 2 partitions - one will be DATA, one will be FRA.

fdisk /dev/sdb

Enter 'n' for a new partition, then enter at the next 3 prompts, then +30G to make the first partition 30GB.

Enter 'n' again and then enter for all the prompts to create the second partition with the rest of the space (10GB).

Finally, enter 'w' to create the partitions


Create the ASM disks

oracleasm createdisk DATA1 /dev/sdb1

oracleasm createdisk FRA1 /dev/sdb2


You can now install the GI software.

Set the password for the grid and oracle users as root

passwd grid

passwd oracle

Login as the grid user and install the grid_home from the zip file.

export ORACLE_HOME=/u01/app/grid/product/19.0.0/grid_home

export PATH=$ORACLE_HOME/bin:$PATH

cd $ORACLE_HOME

pwd

/u01/app/grid/product/19.0.0/grid_home

unzip -oq /tmp/LINUX.X64_193000_grid_home.zip

Once extracted, run the installer

./gridSetup.sh

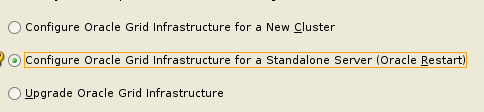
Select 'Configure...for Standalone Server'

Click 'Next'

At the next screen, click on 'Change Discovery Path" and enter "/dev/oracleasm/disks*' and click 'OK'


You should then see this:


Optionally rename the Disk Group to DATA1, change the Redundancy to 'External' and check the box next to '/dev/oracleasm/disks/DATA1'


Click 'Next' - we'll add FRA1 in a minute.

Select 'Use the same password' and enter a suitable one, then click 'Next'


Click 'Next' at the EM screen.

Click 'Next' at the OS group screen.

Change the Oracle Base to /u01/app/grid and click 'Next'


Click 'Next' at the Inventory Directory screen.

Select 'Automatically run scripts' and enter the root password.


Click 'Next'

Fix or ignore any checks and click 'Next'

Click 'Install'

Click 'Yes' at the 'scripts need to be run as root' pop-up.

Close the dialogue when complete.

Export the ORACLE_HOME and PATH

export ORACLE_HOME=/u01/app/grid/product/19.0.0/grid_home
export PATH=$ORACLE_HOME/bin:$PATH

Run asmca

asmca

A GUI should start - expand 'Disk Groups' then click on it


Click on 'Create'

Enter FRA1 as the name, select 'External' for Redundancy and check the box next to the path


Click 'OK', the disk group will be added


Click 'Exit'

Set the ASM instance

. oraenv
+ASM

asmcmd lsdg


You can now create a database and use ASM for the files.

Login to the host as oracle

Set the environment

export ORACLE_HOME=/u01/app/oracle/product/19.0.0/dbhome_1
export PATH=$ORACLE_HOME/bin:$PATH

cd $ORACLE_HOME

unzip -oq /tmp/LINUX.X64_193000_db_home.zip

Once extracted, run the software installer

./runInstaller

Select 'Set up Software Only' and click 'Next'

Select 'Single Instance' and click 'Next'

Select 'Enterprise Edition' and click 'Next'

Click 'Next' at the Oracle Base screen

Select 'Next' at the Group screen

Check 'Automatically run scripts' and enter the root password. Click 'Next'


Fix or ignore the checks, click 'Next' and then 'Install'

Click 'Yes' at the root script pop up..

Close when complete

Still logged in as Oracle, run the dbca to create a database

dbca

Check 'Create a database' and click 'Next'

Enter a database name. Note the Files location points to the ASM disks


Let it default, enter a password and uncheck 'Create as container database'. Click 'Next'

Click 'Finish'

Once created, when you login you can see the database files are in ASM.


So...I shutdown the VM to save resources, and then wanted to have another look and restarted it - and ASM wouldn't start, it gave various CRS errors and just wouldn't start. A bit of investigation found this
https://www.pythian.com/blog/technical-track/how-to-prevent-linux-7-housekeeping-from-breaking-oracle

The bottom line is that you need to do this to prevent Unix from deleting temporary files that are essential for ASM on OEL7:

Add the following to the systemd-tmpfiles configuration file located at /usr/lib/tmpfiles.d/tmp.conf:
x /tmp/.oracle*
 x /var/tmp/.oracle*
 x /usr/tmp/.oracle*

restart the service with systemctl restart systemd-tmpfiles-clean.timer

Before you get too carried away with installing the database and creating things, maybe reboot and check that ASM comes up OK. I ended up having to de-install and re-install grid.


Friday, July 5, 2024

Using Generative AI in Oracle APEX 24.1ai

Carrying on from my previous post on how to install Oracle 23ai FREE and Oracle APEX 24.1ai, this post goes over setting it up in APEX and using some examples.

However, I couldn't get it to work in the VM I created, so instead I set up an APEX instance in Oracle Cloud, and this is how to do it.

Sign up for an account at cloud.oracle.com. Set up 2FA etc.

When logged in, select the 3 bars at the top left and select 'Oracle Database'


At the right of the screen, click on Apex Application Development


At the next screen, select 'Create APEX service'


Give it a name and scroll down


Make sure Always Free is toggled. The only option is V19.


Scroll down, enter a password and leave the access checked.


Scroll down and enter an email address then click on Create APEX service


It will open a new page and show 'Provisioning' - you'll need to wait a few minutes, then click on 'Apex Instances'. Click on the link.


 Click on 'Launch APEX', it will open a new tab.


Use the password you set up earlier.


Click on Create Workspace, then click on New Schema

 Enter a workspace name, username and password, then click on Create Workspace


Log out of Admin and into the new Workspace


This will open up the APEX workspace dashboard, but you need to set up an API key before proceeding.

AI is not implemented in APEX 24.1ai out of the box, it needs to be set up. For this you will need an API from Cohere

So, the first thing to do is create an account in Cohere - it's free.

https://dashboard.cohere.com/welcome/login

Once logged in, go here to generate an API key

https://dashboard.cohere.com/api-keys

Copy it and save it somewhere.

Go back to the APEX page, then to App Builder / Workspace Utilities / All Workspace Utilities


Click on 'Generative AI'


Click on Create

Use the drop-down to select 'Cohere', give it a name and toggle the 'Used by App Builder'


Scroll down to 'Credentials' and enter the API key from Cohere in the 'API Key' field


Click on Create.


Once created, click on App Builder and Create a New App


Click on 'Create App Using Generative AI'


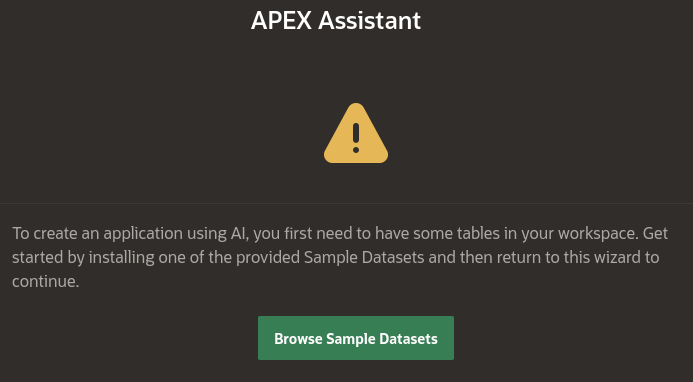
If you don't already have data (and if you follow this post, you won't), it prompts to browse some samples.


I chose the Countries one, so click on install next to that then just click through


Click Exit, then go back and 'Create App Using Generative AI' and click 'Accept' at the prompt


Click on the suggestion


Click on Create Application

Click on Create Application again

Click on Run Application


Login


Well, it's an Application, but not a good one. I think AI has a way to go before it takes our jobs. I'll have a play and do another post with hopefully a better app.

I had another look, and this time I told it to create an application with a home page showing the list of countries and I want to click on the country name and it would show other details and also a population chart. It did a bit better, but not much.


It has more detail, but you can't click on the country name to drill-down. It does have a page with a population chart, but it looks the same as the other one above.

I find it pretty bad that Oracle have released this and it is nowhere near ready for any practical use.

With ChatGPT and other generative AIs, you can build on the input. For example, the scale in the chart goes up to 1 - no good at all. I want to be able to go back to the prompt and say "make the chart scale 100 more than the largest value", but I don't think that's possible here, making it of little use.

I'll continue to experiment to see if it can actually be useful.