APEX V5 has recently been released (May 2015), and it’s
quite a change from previous releases. See my earlier post on how to install it
into a V12C Pluggable Database.
This is my first look at creating an application, and it’s
quite different from V4.2.
Log into the APEX admin screen:
http://servername:port/apex/apex_admin
The screen is a bit different in the new version.
This was the V4.2 Admin screen:
And this is the new V5 one:
So the icons are a bit different so far.
Let’s add a user and a workspace.
I’ve never liked the way this works – you can’t add a user
without a workspace, but you’ve got to specify a schema when you create a
workspace.
The way I do it is to create the workspace first, then the
user. Click on ‘Manage Workspaces’ menu item and select ‘ Create Workspace’:
Give it a name and click ‘Next’:
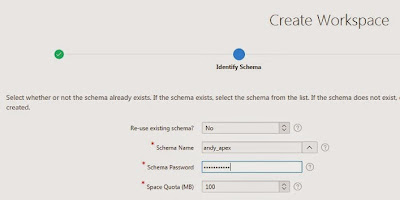
Enter the schema name and a password, and adjust the space
allocation if required:
Click ‘Next’.
Make the Administrator ‘ADMIN’ and enter the password and an
email address:
Click ‘Next’.
Check the information, and if all OK, click ‘Create
Workspace’:
When complete, click ‘Done’
Now create the user.
Click on ‘Manage Workspaces’ and select ‘Manage Developers
and Users’ from the drop-down.
Click on ‘Create User’ and fill in the blanks. Select the
Workspace and schema you just created. Leave ‘User is an administrator’ checked
(unless you don’t want to).
Make sure the ‘Account Availability’ is ‘Unlocked’.
Enter a password, and I always select ‘No’ to change the
password on first use but if you’re doing this for a developer then you
probably want to specify ‘Yes’.
Click on ‘Create User’ at the top right of the screen.
You can now sign out from Admin by clicking on ‘Admin’ at
the top right of the page and selecting ‘Sign Out’:
Then click on ‘Return to Sign In Page’ and login as the new
schema, changing the Workspace and Username:
This is the new home page:
From here, you can install some packaged apps to see how
things work (always a good idea), or start to create a new one. There is a
starter one (Sample Database Application) installed by default.
Clicking on the ‘Packaged Apps’ icon takes you to this
screen:
I’ll leave it to you to explore (click on the ‘Packaged App
Gallery’, but it’s worth looking around and installing some to see how things
work now. I usually install the ‘Sample Charts’ one, that’s helpful.
The Packaged App Gallery:
So, let’s start to create a new app. From the home page,
click on ‘Application Builder’, or use the drop-down ‘Application Builder /
Database Applications’ menu item:
Click on ‘Create’ and select ‘Desktop’:
Give it a name and select the theme and style. I haven’t had
a look through these yet so I just let it default for now:
Click ‘Next’
Since this is just a dummy starter application, just click ‘Next’
at the ‘Add Page’ screen:
Click ‘Next’ again at this screen:
Change the attributes as required – I like to change the
date formats:
Click ‘Next’
If all looks OK, click ‘Create Application’
Should be OK. Click on ‘Run Application’ and sign in when
prompted
Not a lot there, but we’ll change that.
Login to the database as sys and type this:
grant select any dictionary to
andy_apex;
Go back to APEX and click on ‘Edit Page 1’
This is a big difference from V4.2.
This is the V4.2 page:
And this is the new one:
The new interface is all drag and drop.
**AHA! I recently discovered that you can go back to the old interface by clicking on 'Component View':
I have to say I prefer the old interface.
**AHA! I recently discovered that you can go back to the old interface by clicking on 'Component View':
I have to say I prefer the old interface.
To create a new Report Region, click on the ‘Classic Report’ in the bottom frame and drag and drop it into the ‘Content Body’ above:
Once done, some red things appear. This is telling you that
you need to run a SQL query for the report:
So, go to the box at the right and enter a query:
Click on the page and the nasty red colours will disappear.
The right-hand panel is where you enter the other items such
as a title etc:
Save this (‘Save’ at the top right of the page), click on
the ‘x’ of the green box, then click on the ‘play’ icon to run the page:
This should be shown:
So that’s just a first look at APEX V5. If I get time I’ll
have a look at creating an app with charts, date pickers, clickable rows etc.


